Getting Started With Custom Squarespace Development
When it comes to the work that we do, we love to give others a peek under the hood at how we do it. This month we’re taking a look at how we utilize Squarespace’s Developer Mode and Local Server to quickly build marketing websites (as well as some tips and tricks we’ve learned along the way).
Before you start, we highly recommend that you have a familiarity with Git, the command line, npm, and basic knowledge of HTML/CSS/Javascript as well as the Squarespace platform.
Step 1: Setting Up Your Squarespace Site
At General Public, we start every project off by creating a new site from the Base Template. The base template has great benefits for serving as a starting point for your project: it has minimal HTML markup, a proper Squarespace theme file structure, and has plenty of .README.md files to help you if you ever get lost.
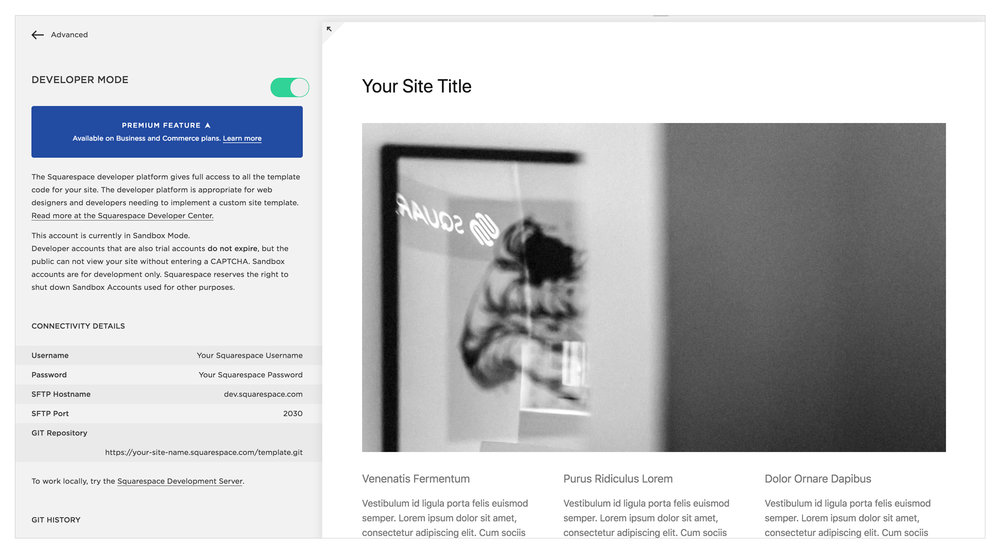
Once you set up your site, head into your site’s advanced settings to enable developer mode, then copy the URL located in the Git Repository field.

You can find developer mode under Settings > Advanced > Developer Mode
Step 2: Clone Your Site
This next step is where things get a little technical, but Squarespace makes everything pretty straight forward. Open up your terminal and navigate to the directory where you want your project to live. Then, clone the repository.
git clone https://your-site-name.squarespace.com/template.git
You’ll be prompted for your username and password to initiate the process. If you see “Unpacking objects: 100% (21/21), done.”, you’re good to go. Next, navigate inside the template directory (this is where all of your files live — if you forget to do this, the following steps won’t work).
cd ./template
You’ll see that everything has a place: less/css files go in the styles folder, javascript files go in the scripts folder, and reusable partials go in the blocks folder.
A few tips for making the most out of Squarespace’s theme file structure:
- Add An Assets Folder: We always add an assets directory to house fonts, images, and other files that are needed by the theme but shouldn’t be uploaded through the CMS.
- Use Multiple Less Files: You don’t have to worry about compiling .less files before you push to master on Squarespace. Instead, all you have to do is include your Less file name in the stylesheets array in your template.conf file. We like to keep our less files short and easy to read, so many times we have multiple files that are modular to keep things as straight-forward as possible when making updates.
- Take Advantage of Squarespace’s Style Editor: When you add a tweak.less file to your theme, you can take full advantage of the Style Editor in Squarespace. This is a great way to develop one custom theme for multiple uses. By using Less variables and mix-ins, you can change styles without ever having to touch your code again. Read the official documentation here.
Step 3: Run The Squarespace Development Server
The Squarespace Development Server is an indispensable tool at General Public. It lets us develop quickly and we find that we can build the front-end for a website while simultaneously plugging in final content to the CMS (avoiding pre-launch content-entry entirely). The development server exists as an npm package that you install once globally in your command line for use on any Squarespace project. Run the following command in your terminal to install the package (depending on your permissions, you may need to use sudo).
npm install -g @squarespace/server
After the package is successfully installed, run the following command to launch the development server. We recommend running this command with the auth flag to avoid server errors, as well as the auto-reload flag to avoid constant manual refreshing. If you receive any errors, double check that you cd’d into the template folder and not the parent directory. If you receive a global npm permissions error, check out this documentation for directions on how to fix it.
squarespace-server https://site-name.squarespace.com --auth -A
If you see a start-up message, congratulations! Open localhost:9000 on any browser and you will see your Squarespace site ready for development.
Step 4: Develop, Develop, Develop
Now that your environment is set up, you can start the fun part: development. Use the development server to work on your project locally and then when you’re ready to push changes to your site, simply do so via Git. If you ever run into errors, you can navigate back to developer mode in your site’s settings to see an error log to help you de-bug.
Squarespace themes can get as complicated or as simple as you want. Most projects at Evangalsit utilize multiple layouts to deliver the most custom web experiences. If you’re looking to add custom post types, Squarespace does that beautifully too. Our biggest tip? Just start developing. We build our sites on Squarespace today in a much different way than when we first started. Like every CMS it has its quirks, but you’ll quickly learn how to make it work for your custom website builds.
